It is never fun to jump behind the wheel and find that your car won’t start. To make matters worse, many instructions on jump-starting do not provide any specifications or guidance specific to hybrid vehicles. So how do you jump-start a hybrid? The local mechanics at Chapel Hill Tire are here with a step-by-step guide.
Step 1: Safety Checks
Before you dive in here, please note that jump-starting a car battery can be dangerous. Hybrid car batteries are expensive and powerful—requiring even more caution. Here are a few safety tips to help you get started:
- During this process, keep all children and pets away from the engine(s).
- Ensure you are in a safe location when jumping a car battery.
- Handle any connection to the battery with caution.
If you are unsure of your ability to maintain the highest level of safety, it is better to be safe than sorry. Consider having your car towed to a local mechanic for service in these cases.
Step 2: Gather Your Materials
Naturally, you will need some tools to help you along your jump-starting journey. There are two ways to jump-start a hybrid:
- Using a jump-starting battery pack: You can jump-start your vehicle on your own using a jump-starting battery pack. If you go this route, you need a well-charged battery jump-starter.
- Using jumper cables: You do not need to worry if you don’t have a battery pack! The traditional way of jump-starting a vehicle will require you to have jumper cables and a “donor” vehicle with a working, well-powered battery.
For the sake of this article, we will assume drivers are using traditional jumper cables—though many steps are the same when using jump-starting packs.
Step 3: Locate the Correct Battery
This step is the most significant difference between jump-starting a gas-powered vehicle and a hybrid. Hybrid cars have two batteries:
- One 12-volt that powers the vehicle like a standard car battery
- One high-powered battery that harnesses the power of regenerative braking to run an electric motor inside the vehicle—making it a hybrid
If your car won’t start, your traditional 12-volt battery is likely the source of these problems. So our next step in jump-starting your vehicle is to pop the hood and locate the correct car battery.
Every hybrid vehicle is different—however, most hybrid batteries are large and rectangular. Meanwhile, standard 12-V car batteries are smaller and boxier—think roughly the size of a child’s shoe box.
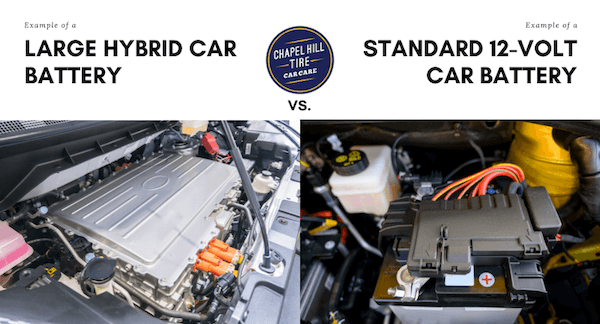
So, where is my battery located? First, take a moment to examine your engine—in most vehicles, you should see your battery when you pop the hood. However, some hybrid cars take on a creative design. In these cases, you might find your battery under the cargo floor or in the trunk.
Many batteries mark the location of the positive battery terminal. So, you can also look for a red plus (+) mark when searching for your battery. It is also helpful to check your owner’s manual for insight into your battery placement.
Step 4: Position the Second Vehicle
Once you find your car battery, you can use this insight to position the donor vehicle. Move the two cars close together—roughly two feet apart. You will need to ensure the vehicles are close enough that the jumper cables can comfortably extend to both batteries simultaneously. At the same time, make sure the two cars are not touching each other.
You should always jump from a battery of equal voltage. Most standard car batteries are 12-volt—but it is worth double-checking both car batteries before getting started.
Step 5: Turn The Donor Vehicle Off
For safety reasons, both vehicles should be turned off when you get started. Presumably, your hybrid vehicle will already be off because the battery is dead. Make sure you also turn off the donor vehicle before hooking up the cables.
Step 6: Positive to Positive
First, you will connect both positive (often red) cable clamps to the positive battery terminals. Again, these are often marked by a plus (+) sign. Start by connecting the dead battery, then move to the functioning battery. Make sure the clamp firmly attaches to the terminal.
Step 7: Negative to Ground and Negative to Negative
Read this step twice, as it is vitally important.
First, connect the negative to ground for the dead car battery. In other words, clamp the negative (often black) cable to an unpainted metal surface in your vehicle—usually the car frame (or chassis). Do not connect it to the negative battery terminal.
Next, connect the negative (-) clamp to the functioning car battery’s negative (-) terminal. Again, avoid any tugging or pulling of the cable. If it cannot comfortably reach, the cars are too far away.
Why not connect to the negative battery terminal of the dead car battery? When a car battery charges, it can release hydrogen gas (which is why this only matters for the dead car battery). Any tiny spark from the jump-starting process can ignite the hydrogen gas, causing a dangerous explosion. This hazard commonly occurs as drivers remove the cables. You can remove the negative cable without risking a spark if it is connected to the grounded metal instead of the battery. Moreover, once you remove the ground cable, you break the connection—substantially reducing any chance of sparking.
Step 8: Start the Functioning Vehicle
Now it is time to start charging your battery. Turn on the functioning vehicle so that it can begin transferring a charge. It might take several minutes to charge, though revving the donor vehicle’s engine a few times can help speed up this process.
Step 9: Try Starting Your Engine
After a few minutes, try starting up your hybrid vehicle. If it doesn’t work, give it a little more time before you try again.
If your battery still doesn’t start after a few tries, you likely have a deeper vehicle issue that requires a tow. There is also a chance that the cables are not properly set up or working. You can troubleshoot this issue by trying with a different donor vehicle or a different set of cables. You can also call a local mechanic to talk through your connection and ensure everything is set up correctly.
Step 10: Carefully Disconnect the Cables
Once your vehicle is running, disconnect the cables in the reverse order of connection:
- First, disconnect the ground cable clamp
- Next, remove the negative clamp from the donor battery
- Then, disconnect the positive clamp from your car battery
- Finally, remove the positive clamp from the donor battery
Step 11: Take Your Vehicle For a Spin
Jump-starting a car is quite an adventure! You are probably eager to drive straight home and take a break. You might also be anxious to get to school, work, or onto your next adventure. However, we recommend taking the scenic route to wherever you are going. Your alternator recharges your battery as you drive. The longer you drive, the less likely you will have to do this all over again the next time you get behind the wheel.
In many cases, a jump-started boost will not last long—even with a health charge from your alternator. So try to visit your local mechanic as soon as conveniently possible. Here is our complete guide on when to replace your dead car battery.
Hybrid Car Care at Chapel Hill Tire
Hybrid vehicles are one of our many specialties here at Chapel Hill Tire. In fact, all of our extended service free loaner cars are hybrids. So you know your vehicle is in good hands when you bring it to our local mechanics. Our experts proudly offer hybrid battery maintenance and replacement services.
Chapel Hill Tire proudly serves the hybrid car care needs of the greater Triangle area through our ten esteemed locations across Cary, Apex, Raleigh, Chapel Hill, Carrboro, and Durham. We invite you to make an appointment or give us a call to get started today!